こんにちは、虎の穴ラボのH.Hです。
本記事は虎の穴ラボ Advent Calendar 2021 - Qiita 17日目の記事です。
16日はM.Mさんの「Webフォントを使ってみよう」でした。
明日はおっくんのDenoに関連する記事です。
今日はGithubActionsを使用したAWSのLambda関数のデプロイの自動化を行った内容をまとめます。
GithubActionsとは
GithubActionsはGithubが提供する機能で、CI/CDのワークフローの設定ファイルを作成して登録するとGithubの操作に合わせて自動で決めた処理を行ってくれるものです。実行には大きく二つの方法があり、Github上で仮想マシンを作成して実行するパターンと別の端末内で動作させるローカルホストランナーというパターンがあります。
公開から2年(2019年11月に一般公開)が経過して様々な用途で利用されています。
今回はGithubActionsの利用方法を、AWS Lambdaの関数と起動のトリガーとなるAPIGatewayを準備し自動的にクラウド環境へデプロイ、また実行時の状況を通知する設定を一連の流れでまとめました。
今回作成する機能
今回は以下の流れでデプロイする流れを整理していきます。使用するアプリケーションはAWS提供のNode.jsのアプリケーション(APIGateway+Lambda)をデプロイを行います。
1)事前準備
2)Slackへの通知
3)デプロイ前のタグ作成
4)テストコードの実行
5)ビルド
6)デプロイ
7)処理成功もしくは失敗の判定
8)完成した設定ファイル
1.事前準備
デプロイにはAWSとGithubそれぞれに設定が必要です。また、今回は通知先としてSlackを使用するので、Slackがメッセージを受け付ける設定を行います。
1.1)AWSの設定
AWSにはデプロイに必要な権限を持ったユーザーとユーザーに設定されるアクセスキーとシークレットアクセスキーが必要になります。
アクセスキーとシークレットアクセスキーは作成時しか見ることができないので注意が必要です。
権限についてはこちらのQiitaの記事で過去にまとめていますのでご確認ください。
今回はAPIGatewayを一緒に作成するので、記事の権限に追加でAPIGatewayの権限が必要になります。
1.2)Slackの設定
通知に用いるためにSlackの通知用のURLを下記のリンク先から生成します。
チャンネルを指定して、Incoming Webhookインテグレーションの追加でURL(以降webhook urlと表記)が作成できます。
1.3)Githubの設定
1.3.1)リポジトリの作成
アプリケーションのソースコードを配置するためのリポジトリを作成します。
今回はgithubactions_lambdaという名前で作成しました。
1.3.2)アクセスキーとシークレットアクセスキーの設定
LambdaのデプロイにはAWSから取得したアクセスキーとシークレットアクセスキーを先ほど作成したリポジトリに設定します。
設定箇所はSettingsの中のSecretsに設定します。
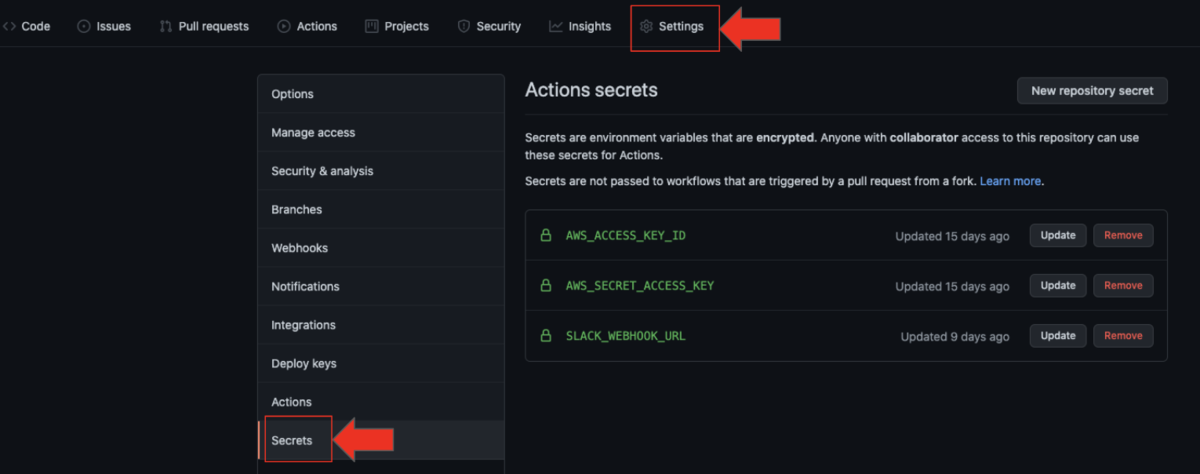
右上の「New repository secret」から変数と代入される値を定義することができます。
今回はAWSのアクセスキーとシークレットアクセスキー、Slackへの通知のためのURLの定義を以下の名前で登録しました。
アクセスキー→ AWS_ACCESS_KEY_ID
シークレットアクセスキー→ AWS_SECRET_ACCESS_KEY
webhook url→ SLACK_WEBHOOK_URL
ここを設定することでGithubActionsの設定ファイルに直接値を記載しなくても参照することができます。
1.4)アプリケーションの準備
ここからはデプロイを行うアプリケーションの準備を行います。
使用するものはAWSがLambdaのテンプレートとして公開している単純にリクエストすると「hello world」を返すアプリケーションとなります。
1.4.1)リポジトリのクローン
先ほど作成したリポジトリをCloneします。
git clone git@github.com:(githubアカウント)/githubactions_lambda.git
1.4.2)Lambda関数の作成
以下のコマンドでテンプレートから関数を作成します。
githubaction_deployという名前のアプリケーションをNode.jsのバージョン14で作成します。
実行にはsamコマンドが必要になるので、以下のページからインストールを行っておきます。
インストール後に実行するコマンドは以下のとおりです。
$ sam init
Which template source would you like to use?
    1 - AWS Quick Start Templates
    2 - Custom Template Location
Choice: 1
What package type would you like to use?
    1 - Zip (artifact is a zip uploaded to S3)
    2 - Image (artifact is an image uploaded to an ECR image repository)
Package type: 1

Which runtime would you like to use?
    1 - nodejs14.x
    2 - python3.8
    3 - ruby2.7
    4 - go1.x
    5 - java11
    6 - dotnetcore3.1
    7 - nodejs12.x
    8 - nodejs10.x
    9 - python3.7
    10 - python3.6
    11 - python2.7
    12 - ruby2.5
    13 - java8.al2
    14 - java8
    15 - dotnetcore2.1
Runtime: 1

Project name [sam-app]: githubaction_deploy

Cloning from https://github.com/aws/aws-sam-cli-app-templates

AWS quick start application templates:
    1 - Hello World Example
    2 - Step Functions Sample App (Stock Trader)
    3 - Quick Start: From Scratch
    4 - Quick Start: Scheduled Events
    5 - Quick Start: S3
    6 - Quick Start: SNS
    7 - Quick Start: SQS
    8 - Quick Start: Web Backend
Template selection: 1

    -----------------------
    Generating application:
    -----------------------
    Name: githubaction_deploy
    Runtime: nodejs14.x
    Dependency Manager: npm
    Application Template: hello-world
    Output Directory: .

    Next steps can be found in the README file at ./githubaction_deploy/README.md
テンプレートの中身の構造は以下のような内容になっています。

アプリケーション本体とtest-handler.jsというユニットテスト用のコードも準備されています。
今回はソースコードは変更せずに利用するので、githubaction_deployのディレクトリで以下のコマンドを実行して手動でAWSに反映できるか確認します。
コマンドは以下の通りです。
$ sam build
$ sam deploy --guided
作成されたsamconfig.tomlはGithubActionsでも使用します。
なので作成されたソースコードと合わせてリポジトリに反映させます。
1.5)GithubActionsのワークフローファイルの作成
リポジトリのタブの中のActionsを選択して、その中の「set up a workflow yourself」を選択します。

リンクを押すと「githubactions_lambda/.github/workflows/」の配下にファイルを作成する画面になります。
初期状態だとmainブランチにプッシュもしくはmainブランチに向けてのプルリクエストが作成された場合にUbuntuの最新版を起動して、文字列を出力する内容になっています。
また処理は-で始まる行が区切りなります。(後で記述する途中で失敗した場合の動きに関わります)
# This is a basic workflow to help you get started with Actions

name: CI

# Controls when the workflow will run
on:
  # Triggers the workflow on push or pull request events but only for the main branch
  push:
    branches: [ main ]
  pull_request:
    branches: [ main ]

  # Allows you to run this workflow manually from the Actions tab
  workflow_dispatch:

# A workflow run is made up of one or more jobs that can run sequentially or in parallel
jobs:
  # This workflow contains a single job called "build"
  build:
    # The type of runner that the job will run on
    runs-on: ubuntu-latest

    # Steps represent a sequence of tasks that will be executed as part of the job
    steps:
      # Checks-out your repository under $GITHUB_WORKSPACE, so your job can access it
      - uses: actions/checkout@v2

      # Runs a single command using the runners shell
      - name: Run a one-line script
        run: echo Hello, world!

      # Runs a set of commands using the runners shell
      - name: Run a multi-line script
        run: |
          echo Add other actions to build,
          echo test, and deploy your project.
このファイルを元に変更していきます。 今回はプルリクエストでは動かす必要はないので以下の記述は削除します。
pull_request:
    branches: [ main ]
-----------------------------
以下のコメントより下の記述
# Runs a single command using the runners shell
2.Slackへの通知
2.1)環境変数の定義
Slackへ通知するためのwebhook url、ユーザー名、アイコン画像を定義します。
定義はworkflow_dispatchとjobsの間に定義します。
設定箇所を抜粋したものが以下のとおりです。
  workflow_dispatch:

env:
  SLACK_WEBHOOK: ${{ secrets.SLACK_WEBHOOK_URL }}
  SLACK_USERNAME: 任意の名前
  SLACK_ICON: 任意の画像

jobs:
2.2)Slack通知
Slackへの通知はrtCampという企業が公開している以下のGithubActionsを使用します。
先ほど定義した環境変数に加えて、タイトルやメッセージおよび通知の色などを指定できます。
使い方は以下の通りです。
     - name: (GithubActionsの中での名前)
        uses: rtCamp/action-slack-notify@v2
        env:
          SLACK_TITLE: (任意の文字列)
          SLACK_MESSAGE: (任意の文字列)
          SLACK_COLOR:(色の指定 goodという単語やカラーコードで指定が可能)
仮に全ての処理の最初にリリース開始の通知を出すために作成する場合の記述は以下の通りです。
     - name: Slack Notification on start
        uses: rtCamp/action-slack-notify@v2
        env:
          SLACK_TITLE: release start
          SLACK_MESSAGE: リリースを開始します
          SLACK_COLOR: good
3.リリース前のタグ作成
GithubActionsは先に書いたように、仮想マシンや別の端末での処理を呼び出して動作させるものです。なので、Gitが使える環境であればgitコマンドが実行することができます。
今回はリリース時にリリース直前時刻をタグとして作成するようにします。
     - name: generate tag
        run: |
           echo "tag-$(TZ=Asia/Tokyo date +%Y%m%d-%H%M%S)" > TAG_NAME
           git tag $(cat TAG_NAME)
           git push origin $(cat TAG_NAME)
「run:」を複数行記述しても実行できますが「run: |」と記述すれば複数行を改行で区切ることで記述できます。
4.テストコードの実行
3と同様にUbuntuの中で行われる処理なので、今回のアプリケーションのテンプレートの中のテストコードを実行することができます。
GithubActionsで作成された仮想マシンの中でソースコードは以下のディレクトリ構造の中に含まれています。
/home/runner/work/(リポジトリ名)/・・・・
今回の場合は以下の構造になっています。
/home/runner/work/githubactions_lambda/githubactions_lambda/githubaction_deploy/hello-world
上記の階層にNode.jsのモジュールをinstallすることで、Node.jsを動作させることができます。
記述するコマンドは以下の通りです。
npm init -y
npm install chai
npm install mocha
mochaがテスト用のツールでchaiがmochaから呼び出されるモジュールになります。
テストコードの実行は以下のコマンドとなります。
npm run test /home/runner/work/githubactions_lambda/githubactions_lambda/githubaction_deploy/hello-world/tests/unit/test-handler.js
package.jsonの中でtestはmochaを使用するというのがテンプレートの時点で記述されています。
上記コマンドでmochaを実行し、その際のテスト内容は後に記述したファイルということになります。
テストが全て正常に実行できれば0、一つでも失敗すれば1が返されます。
5.ビルド
ビルドは以下のコマンドで実行します。ビルド時の設定ファイルを直接指定することで処理が完了します。
sam build -t /home/runner/work/githubactions_lambda/githubactions_lambda/githubaction_deploy/template.yaml
6.デプロイ
デプロイもビルドと同様に設定ファイルを読み込んで処理を行います。
設定ファイルとオプションで、処理が止まることなく完了します。
sam deploy --no-confirm-changeset --no-fail-on-empty-changeset --config-file /home/runner/work/githubactions_lambda/githubactions_lambda/githubaction_deploy/samconfig.toml
7.処理成功もしくは失敗の判定
2~6までの処理を組み合わせることでアプリケーションのテストからビルド、デプロイまでは可能です。
ただし、途中の処理で失敗した場合その時点で処理が終了してしまうため、最後まで処理が行われたか、途中の処理で問題が発生したのかを判断することがGithubの画面からしか確認できなくなります。
結果の確認を必ず行うようにするため全て正常に完了したか、途中の処理で異常が発生したかを判断して通知する処理を追加します。
実装したコードは以下の通りです。
    - name: test and build and deploy
        id: main_step
        run: |
           cd /home/runner/work/githubactions_lambda/githubactions_lambda/githubaction_deploy/hello-world
           npm init -y
           npm install chai
           npm install mocha
           npm run test /home/runner/work/githubactions_lambda/githubactions_lambda/githubaction_deploy/hello-world/tests/unit/test-handler.js
           sam build -t /home/runner/work/githubactions_lambda/githubactions_lambda/githubaction_deploy/template.yaml
           sam deploy --no-confirm-changeset --no-fail-on-empty-changeset --config-file /home/runner/w


     - if: steps.main_step.outcome =='success'
        name: Slack Notification on Success
        uses: rtCamp/action-slack-notify@v2
        env:
          SLACK_TITLE: release start
          SLACK_MESSAGE: リリース終了
          SLACK_COLOR: good

      - if: failure() && steps.main_step.outcome !='failure'
        name: Slack Notification on Failure
        uses: rtCamp/action-slack-notify@v2
        env:
          SLACK_TITLE: release start
          SLACK_MESSAGE: テスト前エラー
          SLACK_COLOR: error

      - if: failure() && steps.main_step.outcome =='failure'
        name: Slack Notification on Failure
        uses: rtCamp/action-slack-notify@v2
        env:
          SLACK_TITLE: release start
          SLACK_MESSAGE: リリース失敗
          SLACK_COLOR: error
idで定義した変数は、-で区切られた範囲の処理が成功した場合はsuccess、失敗した場合はfailureが入ります。
何も定義しなければエラーが発生した場合は後続の処理は行われませんが、「if: failure() 」を定義した範囲の処理は失敗した場合にのみ実行されるようになるため、それまでの処理でエラーになるかつテスト&ビルド&デプロイで失敗した場合に実行されるとなります。
8.完成したファイル
name: 本番デプロイ

on:
  push:
    branches: [ main ]

  workflow_dispatch:

env:
  SLACK_WEBHOOK: ${{ secrets.SLACK_WEBHOOK_URL }}
  SLACK_USERNAME: リリース通知
  SLACK_ICON: (画像ファイルパス)

jobs:
  build:
    runs-on: ubuntu-latest

    steps:
      - uses: actions/checkout@v2

      - name: Slack Notification on start
        uses: rtCamp/action-slack-notify@v2
        env:
          SLACK_TITLE: release start
          SLACK_MESSAGE: リリースを開始します
          SLACK_COLOR: good

      - name: generate tag
        run: |
           echo "tag-$(TZ=Asia/Tokyo date +%Y%m%d-%H%M%S)" > TAG_NAME
           git tag $(cat TAG_NAME)
           git push origin $(cat TAG_NAME)

      - name: Slack Notification on Success
        uses: rtCamp/action-slack-notify@v2
        env:
          SLACK_TITLE: release start
          SLACK_MESSAGE: タグ作成完了&リリース開始
          SLACK_COLOR: good

      - name: Configure AWS credentials
        uses: aws-actions/configure-aws-credentials@v1
        with:
          aws-access-key-id: ${{ secrets.AWS_ACCESS_KEY_ID }}
          aws-secret-access-key: ${{ secrets.AWS_SECRET_ACCESS_KEY }}
          aws-region: ap-northeast-1
      - name: Set up node.js
        uses: actions/setup-node@v1
        with:
          node-version: '14.x'
      - name: test and build and deploy
        id: main_step
        run: |
           cd /home/runner/work/githubactions_lambda/githubactions_lambda/githubaction_deploy/hello-world
           npm init -y
           npm install chai
           npm install mocha
           npm run test /home/runner/work/githubactions_lambda/githubactions_lambda/githubaction_deploy/hello-world/tests/unit/test-handler.js
           sam build -t /home/runner/work/githubactions_lambda/githubactions_lambda/githubaction_deploy/template.yaml
           sam deploy --no-confirm-changeset --no-fail-on-empty-changeset --config-file /home/runner/work/githubactions_lambda/githubactions_lambda/githubaction_deploy/samconfig.toml

      - if: steps.main_step.outcome =='success'
        name: Slack Notification on Success
        uses: rtCamp/action-slack-notify@v2
        env:
          SLACK_TITLE: release start
          SLACK_MESSAGE: リリース終了
          SLACK_COLOR: good

      - if: failure() && steps.main_step.outcome !='failure'
        name: Slack Notification on Failure
        uses: rtCamp/action-slack-notify@v2
        env:
          SLACK_TITLE: release start
          SLACK_MESSAGE: テスト前エラー
          SLACK_COLOR: error

      - if: failure() && steps.main_step.outcome =='failure'
        name: Slack Notification on Failure
        uses: rtCamp/action-slack-notify@v2
        env:
          SLACK_TITLE: release start
          SLACK_MESSAGE: リリース失敗
          SLACK_COLOR: error
実行結果
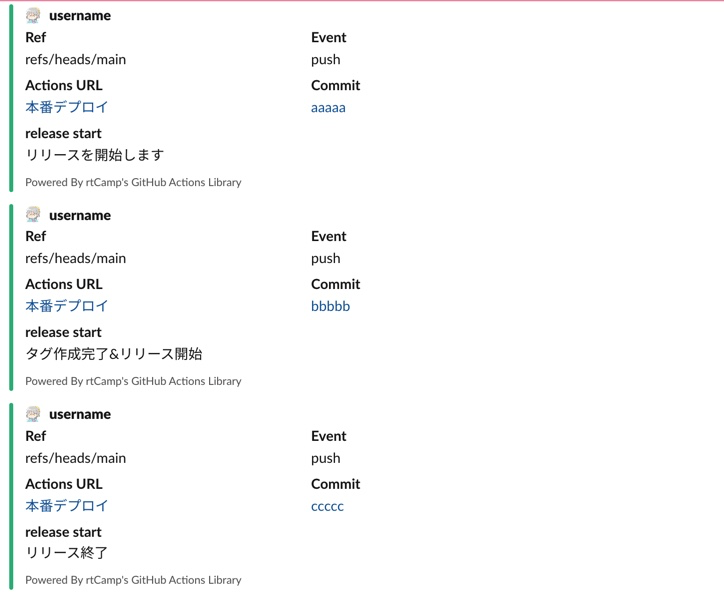
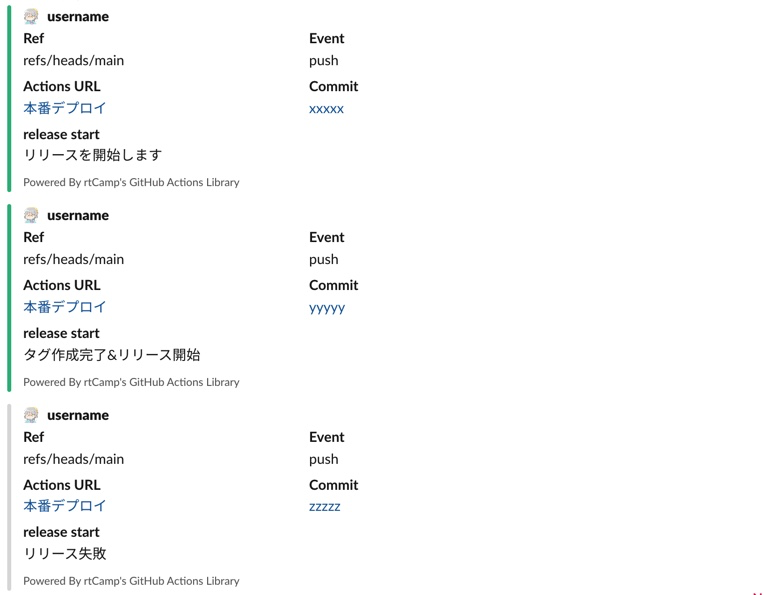
実際に実行した結果は以下のとおりです。(名前やコミット時のIDなどは実際のものから変更しています)
成功の場合
失敗の場合
まとめ
今回はGithubActionsを使用しての通知やテスト、デプロイまでの一連の流れを自動で行う方法についてまとめました。
全てを一連の流れで説明しているので、今GithubActionsを使っている人も使おうか考えている人にも参考になればと思います。
P.S.
採用情報
■募集職種
yumenosora.co.jp
カジュアル面談も随時開催中です
■お申し込みはこちら!
news.toranoana.jp
■ToraLab.fmスタートしました!
メンバーによるPodcastを配信中!
是非スキマ時間に聞いて頂けると嬉しいです。
anchor.fm
■Twitterもフォローしてくださいね!
ツイッターでも随時情報発信をしています
twitter.com
