 皆さんこんにちは。とらラボのNSSです。
本記事は虎の穴ラボAdvent Calendar 2022-Qiita 17日目の記事です。
16日目はH.Kさんの「レビュー者におすすめ!『読みやすいコードのガイドライン』を読んでの感想」でした。
また、明日18日目は山田さんの「はじめてのPrometheus」です。
今回は、Next.js + AWS Amplify で汎用的に使えそうなユーザー認証の実装をご紹介しようと思います。
今回の記事では細かい設定等は取り扱わないですが、
Amplifyは非常に分かりやすいチュートリアルが用意されていますので、こちらも参考にしつつご覧ください。
Amplifyの設定
Amplify CLIをインストールします。
$ npm install -g @aws-amplify/cli
Amplify CLIの設定をします。
$ amplify configure
Next.jsアプリケーションの作成
Next.jsのアプリケーションを生成します。
$ npx create-next-app <アプリ名> --typescript
作成されたディレクトリに移動し、本アプリにおけるAmplifyの設定を行います。
$ amplify init
ユーザー認証機能の実装
アプリケーションにユーザー認証機能を追加するために以下のコマンドを実行します。
$ amplify add auth
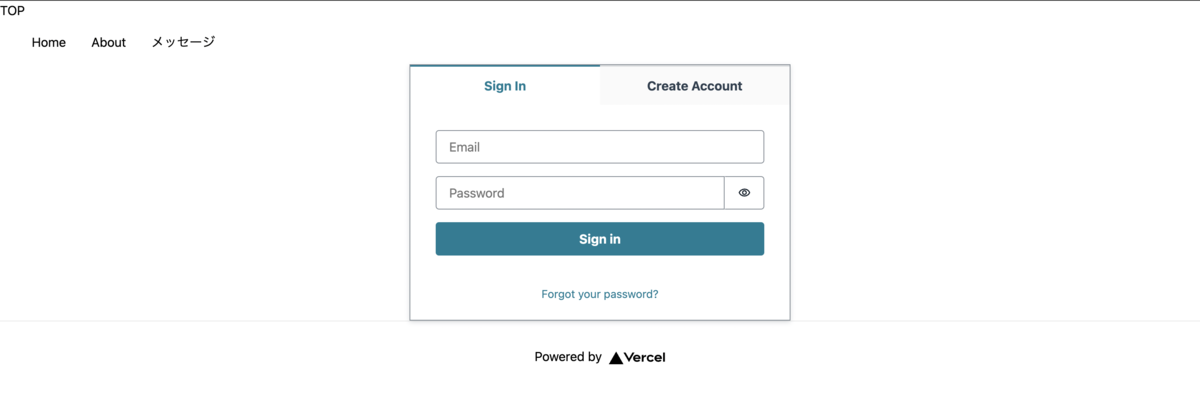
ログイン
一番かんたんにユーザー認証を実装する方法を紹介します。
Amplify UIのAuthenticatorを利用して簡単にユーザー認証画面を実装することができます。
以下のコマンドを実行してAmplify UIをインストールします。
$ npm install @aws-amplify/ui-react
<Authenticator>タグで認証させたい要素を囲みます。
また以下のライブラリをimportします。
import { Authenticator } from '@aws-amplify/ui-react';
import '@aws-amplify/ui-react/styles.css';
以下、実装例です。
pages/index.tsx
import type { NextPage } from 'next' import Head from 'next/head' import Image from 'next/image' import styles from '../styles/Home.module.css' import { Authenticator } from '@aws-amplify/ui-react'; import '@aws-amplify/ui-react/styles.css'; import awsExports from 'src/aws-exports'; import Amplify from 'aws-amplify'; Amplify.configure(awsExports); const Home: NextPage = () => { return ( <Authenticator> <div className={styles.container}> <Head> <title>Create Next App</title> <meta name="description" content="Generated by create next app" /> <link rel="icon" href="/favicon.ico" /> </Head> <main className={styles.main}> <h1 className={styles.title}> Welcome to <a href="https://nextjs.org">Next.js!</a> </h1> <p className={styles.description}> Get started by editing{' '} <code className={styles.code}>pages/index.tsx</code> </p> <div className={styles.grid}> <a href="https://nextjs.org/docs" className={styles.card}> <h2>Documentation →</h2> <p>Find in-depth information about Next.js features and API.</p> </a> <a href="https://nextjs.org/learn" className={styles.card}> <h2>Learn →</h2> <p>Learn about Next.js in an interactive course with quizzes!</p> </a> <a href="https://github.com/vercel/next.js/tree/canary/examples" className={styles.card} > <h2>Examples →</h2> <p>Discover and deploy boilerplate example Next.js projects.</p> </a> <a href="https://vercel.com/new?utm_source=create-next-app&utm_medium=default-template&utm_campaign=create-next-app" className={styles.card} > <h2>Deploy →</h2> <p> Instantly deploy your Next.js site to a public URL with Vercel. </p> </a> </div> </main> <footer className={styles.footer}> <a href="https://vercel.com?utm_source=create-next-app&utm_medium=default-template&utm_campaign=create-next-app" target="_blank" rel="noopener noreferrer" > Powered by{' '} <span className={styles.logo}> <Image src="/vercel.svg" alt="Vercel Logo" width={72} height={16} /> </span> </a> </footer> </div> </Authenticator> ) } export default Home
Create Accountから登録したアカウント情報でログインすると<Authenticator>タグで囲んだ要素が閲覧可能になります。
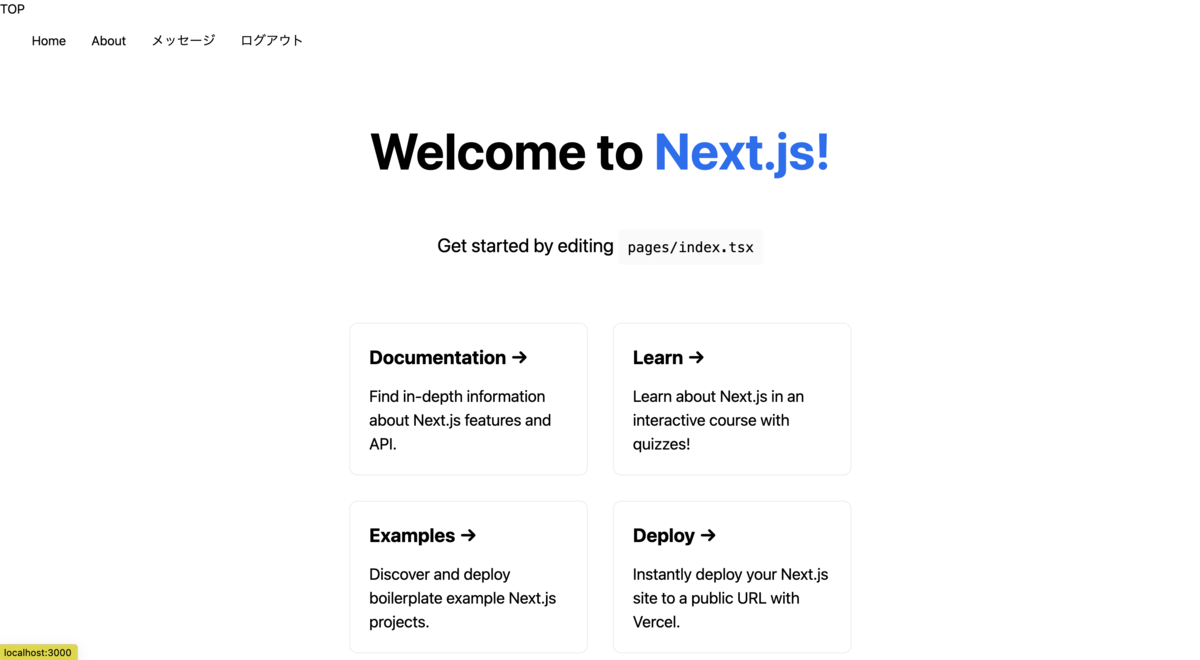
ログアウト
サインインしたあとログアウトするリンクをナビゲーションバーに表示します。
Navコンポーネントを<Authenticator.Provider>で囲みます。
import { Authenticator } from "@aws-amplify/ui-react"
import Logo from "./logo"
import Nav from "./nav"

const Header = () => {
  return (
    <header>
      <Logo/>
      <Authenticator.Provider>
        <Nav/>
      </Authenticator.Provider>
    </header>
  )
}

export default Header
以下のコンポーネントをそれぞれ作成します。
Nav.tsx
import { useAuthenticator } from "@aws-amplify/ui-react";
import Link from "next/link"
import styles from "styles/Nav.module.css"
import Logout from "./logout";

const Nav = () => {
  const { route } = useAuthenticator((context) => [context.route]);

  return(
    <nav>
      <ul className={styles.list}>
        <li>
          <Link href={"/"}>Home</Link>
        </li>
        <li>
          <Link href={"/about"}>About</Link>
        </li>
        <li>
          <Link href={"/message"}>メッセージ</Link>
        </li>
        {route == "authenticated" ? <Logout/>  : ''}
      </ul>
    </nav>
  )
}

export default Nav
Logout.tsx
import { Auth } from "aws-amplify"

const Logout = () => {
  return <li><a onClick={() => Auth.signOut()} >ログアウト</a></li>
}


export default Logout
これでログインしたときにログアウトリンクが表示ができるようになります。
アクセス制限
ユーザー認証がない場合、アクセスさせたくない場合があります。 今回は以下のようなコンポーネントを作成し、ログインしていないと表示できないようにしました。
components/requireAuth.tsx
import { useAuthenticator } from '@aws-amplify/ui-react';
import Link from 'next/link';

interface Props {
  children: JSX.Element;
}

export const RequireAuth = ({ children }: Props) => {
  const { route } = useAuthenticator((context) => [context.route]);

  if (route !== 'authenticated') {
    return (
      <>
        <p>ログインしないと使えません</p>
        <Link href={"/"} >戻る</Link>
      </>
    );
  }
  return children;
}
このコンポーネントをアクセス制限したいページに入れます。
pages/message.tsx
import { Heading } from "@aws-amplify/ui-react"
import { RequireAuth } from "components/requireAuth"

const Message = () => {
  return (
    <RequireAuth>
      <Heading>メッセージを表示</Heading>
    </RequireAuth>
  )
}

export default Message
カスタマイズ
Authenticatorはこのままでも便利ですが、 アプリケーションに合わせてカスタマイズすることができます。
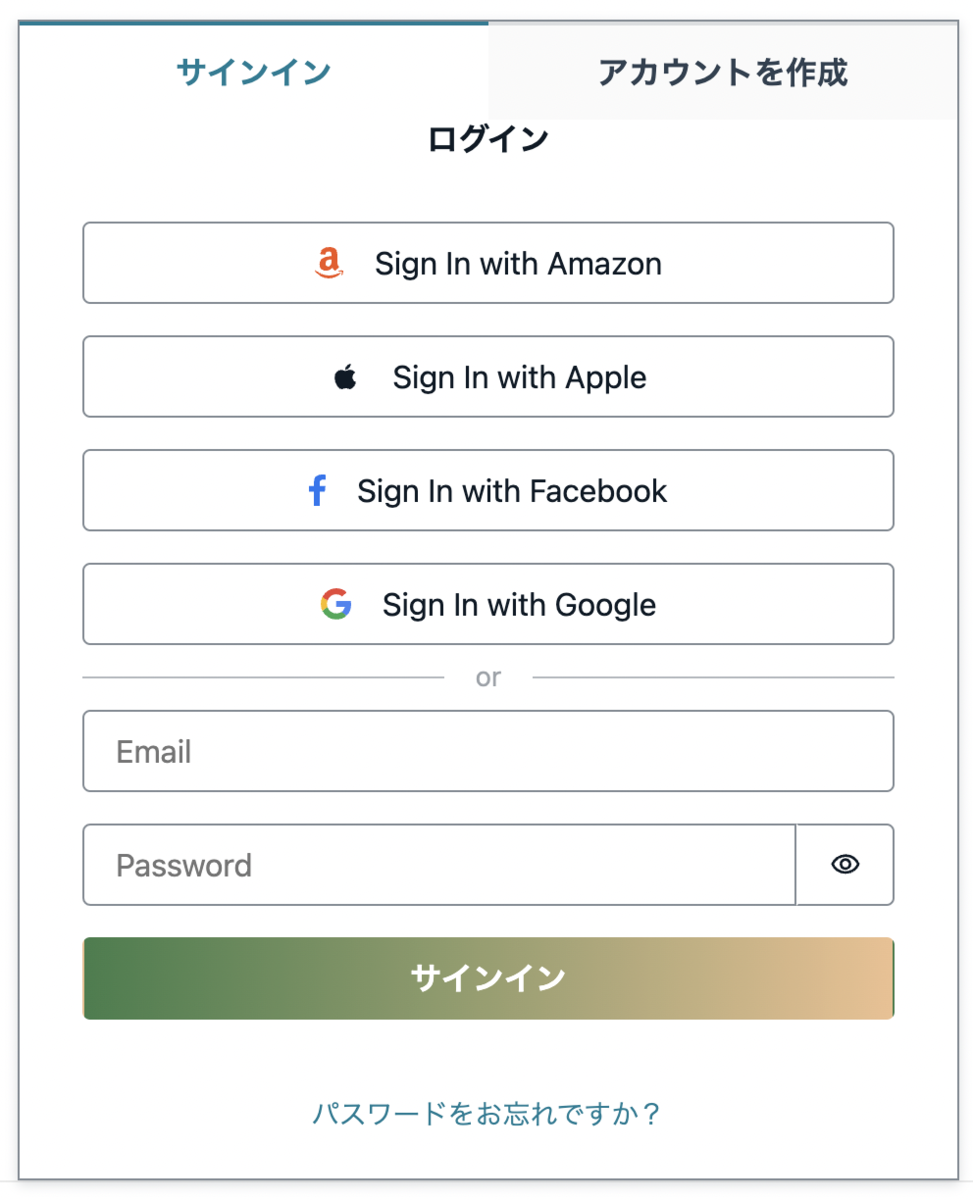
ソーシャルログインを追加
ソーシャルログインを追加します。
Authenticatorを以下のようにします。
<Authenticator socialProviders={['amazon', 'apple', 'facebook', 'google'] }>

日本語化
Authenticatorはデフォルトが英語です。日本語化するには以下の実装を追加します。
import Amplify, { I18n } from 'aws-amplify';

import { translations } from '@aws-amplify/ui';
I18n.putVocabularies(translations);
I18n.setLanguage('ja');
独自の翻訳を適用することもできます。
独自の翻訳を設定する場合は以下のようなファイルを作成します。
assets/i18n/amplify/vocabularies.tsx
export const vocabularies = {
  ja: {
      'Sign In': 'サインイン',
      'Sign Up': 'サインアップ',
      'Sign Out': 'サインアウト',
      'Sign in to your account': 'アカウントにサインイン',
      'Username *': 'ユーザー名 *',
      'Password *': 'パスワード *',
      'Enter your username': 'ユーザー名を入力',
      'Enter your password': 'パスワードを入力',
      'No account?': 'アカウントが未登録ですか?',
      'Forgot your password?': 'パスワードをお忘れですか?',
      'Reset password': 'パスワードをリセット',
      'User does not exist': 'ユーザーが存在しません',
      'User already exists': 'ユーザーは既に存在します',
      'Incorrect username or password.': 'ユーザー名またはパスワードが違います',
      'Invalid password format': 'パスワードのフォーマットが不正です',
      'Create account': 'アカウントを作成',
      'Forgot Password': 'パスワードを忘れた',
      'Change Password': 'パスワードを変更',
      'New Password': '新しいパスワード',
      'Email': 'Email',
      'Phone Number': '電話番号',
      'Confirm a Code': 'コードを確認',
      'Confirm Sign In': 'サインインを確認',
      'Confirm Sign up': 'サインアップを確認',
      'Back to Sign In': 'サインインに戻る',
      'Send Code': 'コードを送信',
      'Confirm': '確認',
      'Resend Code': 'コードを再送',
      'Submit': '送信',
      'Skip': 'スキップ',
      'Verify': '検証',
      'Verify Contact': '連絡先を検証',
      'Code': 'Code',
      'Confirmation Code': '確認コード',
      'Lost your code?': 'コードがありませんか?',
      'Account recovery requires verified contact information': 'Account recovery requires verified contact information',
      'Invalid phone number format': '不正な電話番号フォーマットです。 電話番号は次のフォーマットで入力してください: +12345678900',
      'Create Account': 'アカウントを作成',
      'Have an account?': 'アカウントをお持ちですか?',
      'Sign in': 'サインイン',
      'Create a new account': '新しいアカウントを作成',
      'Reset your password': 'パスワードをリセット',
      'An account with the given email already exists.': 'そのメールアドレスは既に存在します',
      'Username cannot be empty': 'ユーザー名は必須です',
      'Password attempts exceeded': 'パスワード試行回数が超過しました',
  },
};
importする対象を変更すれば適用されます。
import { vocabularies } from '../assets/i18n/amplify/vocabularies';
I18n.putVocabularies(vocabularies);
ヘッダーの追加
ログインのコンポーネントに説明や画像を追加したい場合、以下のようにヘッダーに追加することができます。
components/AuthenticationComponent.tsxを作成します。
import { Heading } from '@aws-amplify/ui-react'
import styles from '../styles/AuthenticatorComponent.module.css'

const AuthenticatorComponent = {
  SignIn: {

    Header() {
      return <Heading className={styles.loginHeader}>ログイン</Heading>
    },
  },
}

export default AuthenticatorComponent
Authenticatorにcomponents={AuthenticatorComponent}を追加します。
import AuthenticatorComponent from '../components/AuthenticatorComponent';

<Authenticator socialProviders={['amazon', 'apple', 'facebook', 'google'] } components={AuthenticatorComponent} >

スタイルの変更
ボタンの色を変更することもできます。
.amplify-button[data-variation='primary'] {
  background: linear-gradient(
    to right,
    var(--amplify-colors-green-80),
    var(--amplify-colors-orange-40)
  );
}
まとめ
今回は、Next.js + Amplifyでユーザー認証を実装する手順をご紹介しました。
Amplify UIのAuthenticatorを利用することで、少ないコードでユーザー認証を実装することができました。
カスタマイズもとても楽なので是非開発に利用してみてください。
P.S.
採用
虎の穴では一緒に働く仲間を募集中です!
この記事を読んで、興味を持っていただけた方はぜひ弊社の採用情報をご覧下さい。
yumenosora.co.jp
LINEスタンプ
エンジニア専用のメイドちゃんスタンプが完成しました!
「あの場面」で思わず使いたくなるようなスタンプから、日常で役立つスタンプを合計40個用意しました。
エンジニアの皆さん、エンジニアでない方もぜひスタンプを確認してみてください。
store.line.me
