こんにちは、虎の穴ラボのNSSです。
最近ReactやTypeScriptを勉強中なのですが、Reactで作ったアプリケーションを簡単にデプロイして公開できるツールとして、AWS Amplifyがあります。
AWS Amplifyとは、AWSが提供するモバイルやWEBのアプリケーションを素早く開発することができるプラットフォームです。
AWS Amplifyは、たった数クリックでアプリケーションをデプロイできる他、
コマンドラインツールを使ってユーザー認証やAPIなど、あらゆる機能を簡単にアプリケーションに追加することができます。
今回は、ReactベースのフレームワークであるNext.js と AWS Amplifyを使ったアプリ開発をご紹介します。
環境
- Node.js (v16.4.1)
- Next.js (v10.2.0)
- TypeScript
Node.jsはインストール済みであることを前提としてこの後の作業を実施します。
作成するアプリケーションについて
Amplify公式ドキュメントに記載されているチュートリアルを参考にアプリケーションを作成します。
チュートリアルで解説されているのはJavaScriptでの実装なのですが、TypeScriptでの実装に挑戦しました。
TypeScript化については以下の記事を参考にさせていただきました。
チュートリアルを参考にメッセージを投稿して、画面に表示する簡単な掲示板アプリを作成します。
実装するアプリケーションの機能は以下のとおりです。
- ユーザーログイン
- メッセージを投稿(投稿したらメッセージの詳細画面に遷移)
- 投稿されたメッセージをトップページに表示
AWS Amplifyの設定
Amplify CLIのインストール
$ npm install -g @aws-amplify/cli
$ amplify configure
以下のように設定します。
Specify the AWS Region
? region:  ap-northeast-1
Specify the username of the new IAM user:
? user name:  amplify-cli-user
Complete the user creation using the AWS console
ブラウザが起動しますのでAWSへログインします。
IAMユーザーの作成を求められるので作成します。
アクセス許可の設定で「既存のポリシーを直接アタッチ」を選択し、Amplifyで検索で出てくる以下にチェックします。
「AdministratorAccess-Amplify」
Amplifyの初期設定
以下のコマンドで初期設定を行います。
$ amplify init
? Initialize the project with the above configuration? Yes
? Select the authentication method you want to use: AWS profile
? Please choose the profile you want to use amplify-cli-user
Next.jsアプリケーションの作成
Next.jsのアプリケーションを新規に作成します。
create-next-app@xx.x.xでバージョン指定できます。
今回は、バージョン10系を指定して作成します。
$ npx create-next-app@10.2.0 --ts my-next-app
※ 実装時点(2021年9月時点)ではNext.jsのバージョンを指定せずに実装したところ、
Next.jsのバージョン11.1.0がインストールされましたが、
アプリでメッセージ送信したところエラーになってしまいました。
Next.jsのバージョン10系にしたところ動作しました。
Next.jsのバージョンが11系の場合、メッセージを投稿後メッセージ詳細画面に遷移するところでエラーになります。
エラーの解消については下記のissueを参考にしました。
Amplifyライブラリをインストール
$ npm install aws-amplify @aws-amplify/ui-react
AmplifyでAPIの実装
以下のコマンドでAPIを追加します。
$ amplify add api
コマンドの対話形式で設定します。 APIは「REST」か「GraphQL」 を選択できますが、今回は「GraphQL」を選択します。 API名は「mynextapp」としています。 その他の設定項目は設定項目が多いので、以下を参考にして設定してください。
? Please select from one of the below mentioned services: GraphQL
? Provide API name: mynextapp
? Choose the default authorization type for the API API key
? Enter a description for the API key:
? After how many days from now the API key should expire (1-365): 7
? Do you want to configure advanced settings for the GraphQL API Yes, I want to make some additional changes.
? Configure additional auth types? Yes
? Choose the additional authorization types you want to configure for the API Amazon Cognito User Pool
Cognito UserPool configuration
Using service: Cognito, provided by: awscloudformation

 The current configured provider is Amazon Cognito.

 Do you want to use the default authentication and security configuration? Default configuration
 Warning: you will not be able to edit these selections.
 How do you want users to be able to sign in? Email
 Do you want to configure advanced settings? No, I am done.
Successfully added auth resource mynextappXXXXX locally

Some next steps:
"amplify push" will build all your local backend resources and provision it in the cloud
"amplify publish" will build all your local backend and frontend resources (if you have hosting category added) and provision it in the cloud

? Enable conflict detection? No
? Do you have an annotated GraphQL schema? No
? Choose a schema template: Single object with fields (e.g., “Todo” with ID, name, description)

The following types do not have '@auth' enabled. Consider using @auth with @model
         - Todo
Learn more about @auth here: https://docs.amplify.aws/cli/graphql-transformer/auth


GraphQL schema compiled successfully.

Edit your schema at /path/my-next-app/amplify/backend/api/mynextapp/schema.graphql or place .graphql files in a directory at /path/my-next-app/amplify/backend/api/mynextapp/schema
? Do you want to edit the schema now? (y/N) y
上記設定の Choose a schema template:という項目で、Single object with fields (e.g., “Todo” with ID, name, description)を選択することで、
Todoのデータ構造を定義したschema.graphqlというファイルが自動生成されます。
Todoのデータ構造は"name"と"description"が定義されていますが、今回の掲示板アプリではメッセージが必要なので、
schema.graphqlを以下のように修正します。
デプロイの際、AWS Amplifyがschema.graphqlの実装に対応したDynamoDBのテーブルやCRUDを実行するQueryやMutationを一通り自動生成します。
type Post
  @model
  @auth(rules: [{ allow: owner }, { allow: public, operations: [read] }]) {
  id: ID!
  message: String!
}
APIのデプロイ
$ amplify push
コマンドで以下のような設定をします。
? Do you want to generate code for your newly created GraphQL API Yes
? Choose the code generation language target typescript
? Enter the file name pattern of graphql queries, mutations and subscriptions src/graphql/**/*.ts
? Do you want to generate/update all possible GraphQL operations - queries, mutations and subscriptions Yes
? Enter maximum statement depth [increase from default if your schema is deeply nested] 2
? Enter the file name for the generated code src/API.ts
Next.jsの実装
まずはトップの画面を実装していきます。
pages/index.tsx
import Amplify, { API, Auth, withSSRContext } from 'aws-amplify';
import { GRAPHQL_AUTH_MODE } from '@aws-amplify/api-graphql'
import awsExports from "../src/aws-exports";
import type { GetServerSideProps } from 'next'
import Head from 'next/head'
import Image from 'next/image'
import React from 'react';
import styles from '../styles/Home.module.css'
import { listPosts } from '../src/graphql/queries';
import { createPost } from '../src/graphql/mutations';
import { CreatePostMutation } from '../src/API';
import { AmplifyAuthenticator } from '@aws-amplify/ui-react';

Amplify.configure({ ...awsExports, ssr: true });

interface Post {
  id: string;
  message: string;
}

export const getServerSideProps: GetServerSideProps = async ({ req }) => {
  const SSR = withSSRContext({ req });
  const response = await SSR.API.graphql({ query: listPosts });

  return {
    props: {
      posts: response.data.listPosts.items,
    },
  };
}

const handleCreatePost = async (event: React.FormEvent<HTMLFormElement>) => {
  event.preventDefault();

  const form = new FormData(event.currentTarget);

  try {
    const result = await API.graphql({
      authMode: GRAPHQL_AUTH_MODE.AMAZON_COGNITO_USER_POOLS,
      query: createPost,
      variables: {
        input: {
          message: form.get("message"),
        },
      },
    });
    if ("data" in result && result.data){
      const data = result.data as CreatePostMutation
      window.location.href = `/posts/${data.createPost!.id}`;

    }
  } catch ({ errors }) {
    console.error(...errors);
    throw new Error(errors[0].message);
  }
}

const Home = ({ posts = [] }: { posts: Post[] }) => {
  return (
    <div className={styles.container}>
      <Head>
        <title>Amplify + Next.js</title>
        <meta name="description" content="Generated by create next app" />
        <link rel="icon" href="/favicon.ico" />
      </Head>
      <AmplifyAuthenticator>
        <main className={styles.main}>
          <h1 className={styles.title}>メッセージ送ってみる</h1>

          <p className={styles.description}>
            <code className={styles.code}>{posts.length}</code>
            posts
          </p>

          <p className={styles.grid}>
            {posts.map((post) => (
              <a className={styles.card} href={`/posts/${post.id}`} key={post.id}>
                <p>{post.message}</p>
              </a>
            ))}

            <div className={styles.card}>
              <h3 className={styles.title}>投稿する</h3>


                <form onSubmit={handleCreatePost}>
                  <fieldset>
                    <legend>メッセージ</legend>
                    <textarea
                      defaultValue="Amplify + Next.js + Typescriptでアプリつくってみた!"
                      name="message"
                    />
                  </fieldset>

                  <button>投稿する</button>
                  <button onClick={() => Auth.signOut()}>Sign out</button>
                </form>

            </div>
          </p>
        </main>
      </AmplifyAuthenticator>

      <footer className={styles.footer}>
        <a
          href="https://vercel.com?utm_source=create-next-app&utm_medium=default-template&utm_campaign=create-next-app"
          target="_blank"
          rel="noopener noreferrer"
        >
          Powered by{' '}
          <span className={styles.logo}>
            <Image src="/vercel.svg" alt="Vercel Logo" width={72} height={16} />
          </span>
        </a>
      </footer>
    </div>
  )
}

export default Home
投稿メッセージの詳細を実装します。
pages/posts/[id].tsx
import { Amplify, API, withSSRContext } from "aws-amplify"; import { GRAPHQL_AUTH_MODE } from '@aws-amplify/api-graphql' import { GetStaticPaths, InferGetStaticPropsType, NextPage } from "next"; import Head from "next/head"; import { useRouter } from "next/router"; import { GetPostQuery, ListPostsQuery } from "../../src/API"; import awsExports from "../../src/aws-exports"; import { deletePost } from "../../src/graphql/mutations"; import { getPost, listPosts } from "../../src/graphql/queries"; import styles from "../../styles/Home.module.css"; Amplify.configure({ ...awsExports, ssr: true }); export const getStaticPaths: GetStaticPaths = async () => { const SSR = withSSRContext() const result = await SSR.API.graphql({ query: listPosts }) const data = result.data as ListPostsQuery if (!data.listPosts || !data.listPosts.items) { throw new Error('listPosts error') } const paths = data.listPosts.items.map((post) => ({ params: { id: post!.id }, })) return { fallback: true, paths, } } type Params = { params: { id: string } } export const getStaticProps = async ({ params }: Params) => { const SSR = withSSRContext() const { id } = params const result = await SSR.API.graphql({ query: getPost, variables: { id, }, }) const data = result.data as GetPostQuery if (data.getPost === null) { throw new Error('getPost error') } return { props: { post: data.getPost, }, } } const PostComponent: NextPage<InferGetStaticPropsType< typeof getStaticProps >> = (props: { post: GetPostQuery['getPost'] }) => { const router = useRouter() const { post } = props if (router.isFallback || !post) { return ( <div className={styles.container}> <h1 className={styles.title}>Loading…</h1> </div> ) } const handleDelete = async () => { try { await API.graphql({ authMode: GRAPHQL_AUTH_MODE.AMAZON_COGNITO_USER_POOLS, query: deletePost, variables: { input: { id: post.id }, }, }) window.location.href = '/' } catch ({ errors }) { console.error(...errors) throw new Error(errors[0].message) } } return ( <div className={styles.container}> <Head> <title>{post.message} - Amplify + Next.js</title> <link rel="icon" href="/favicon.ico" /> </Head> <main className={styles.main}> <p className={styles.description}>{post.message}</p> </main> <footer className={styles.footer}> <button onClick={handleDelete}>🚮投稿を削除する</button> </footer> </div> ) } export default PostComponent
AWS Amplifyで管理画面の実装
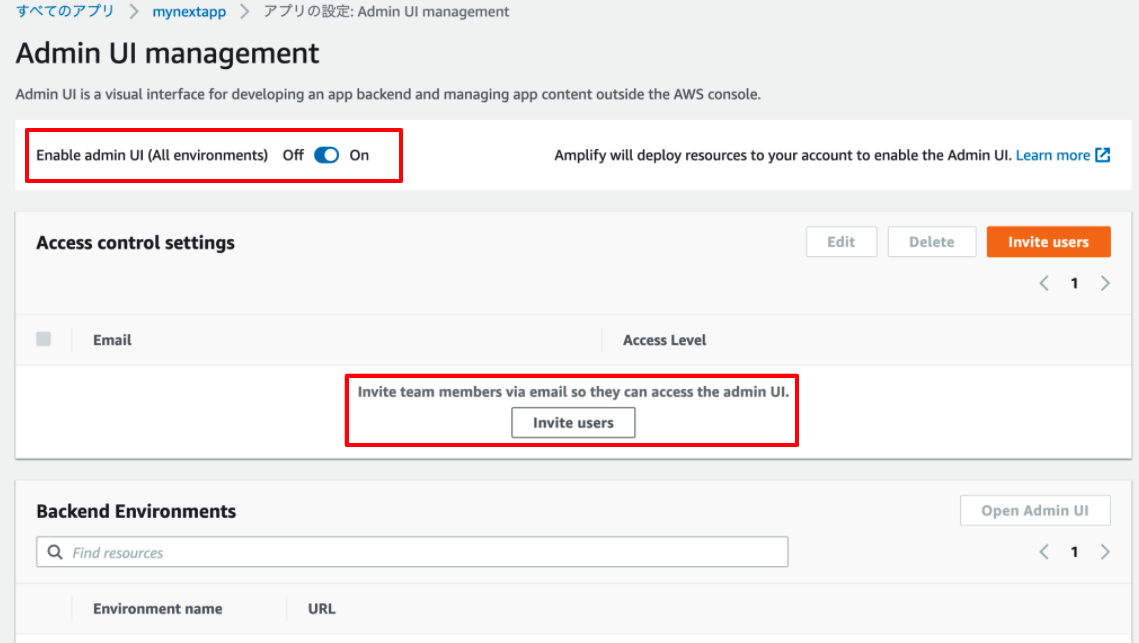
AWS AmplifyではAdmin UIという管理画面に関する機能が提供されています。 Admin UIを使用することで、コードを書かずにコンテンツやユーザーを管理する画面を実装することができます。
Admin UIを使用するにはAWS AmplifyのWebコンソールからAdmin UIをONにします。 Invite Userをクリックして管理者を登録します。
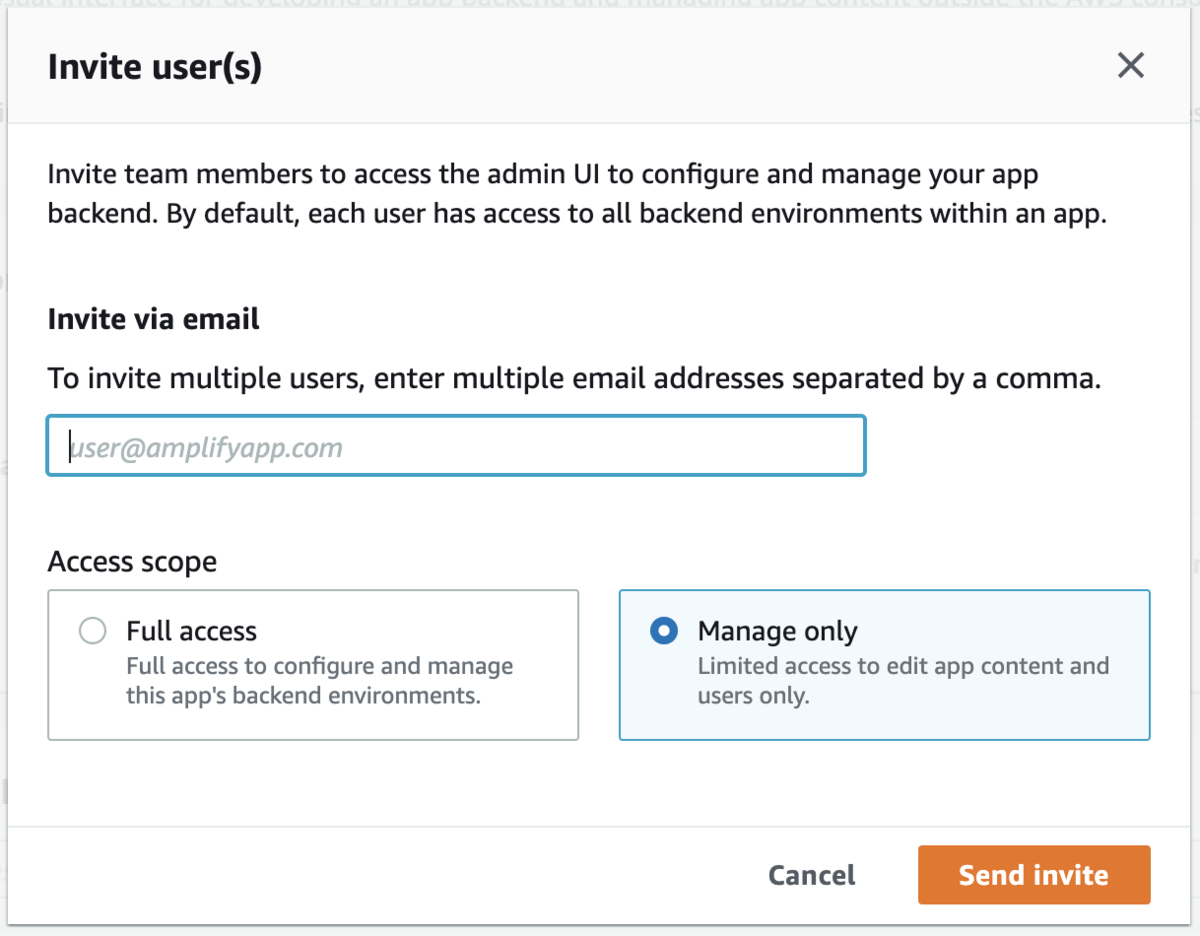
登録した管理者のメールアドレスで管理画面にログインします。
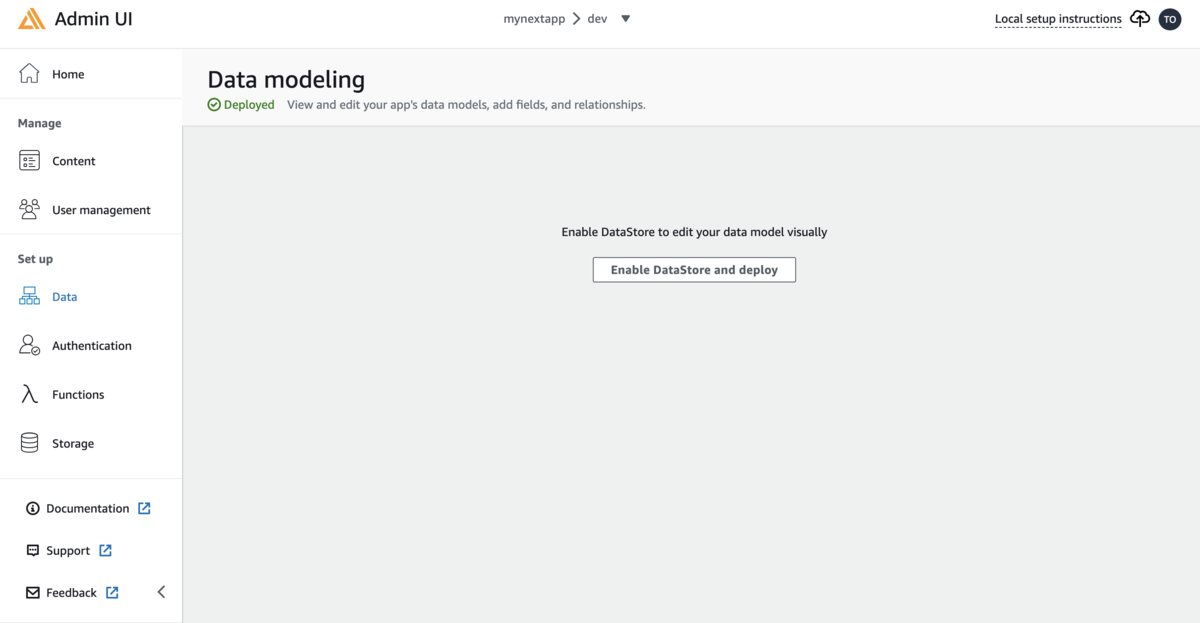
 サイドメニューのDataを選択し、真ん中のボタンを押してDataStoreをデプロイします。
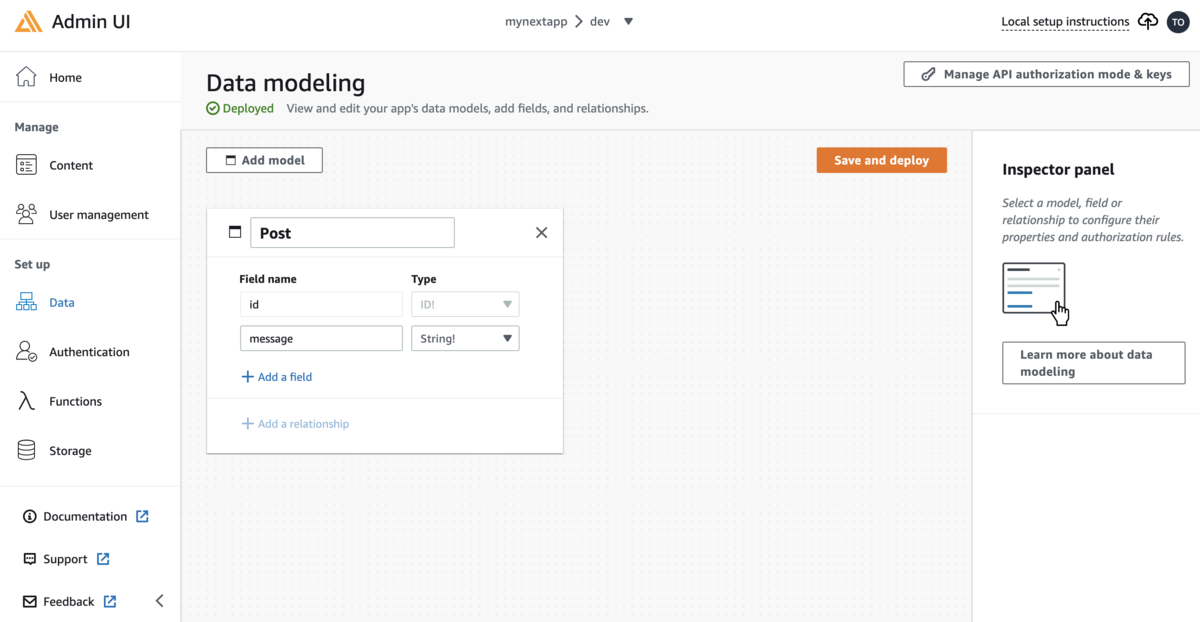
先に schema.graphql で設定したモデルが出来上がります。
アプリケーションの公開
$ amplify hosting add
? Select the plugin module to execute Hosting with Amplify Console (Managed hosting with custom domains, Continuous deployment)

? Choose a type Continuous deployment (Git-based deployments)
? Continuous deployment is configured in the Amplify Console. Please hit enter once you connect your repository
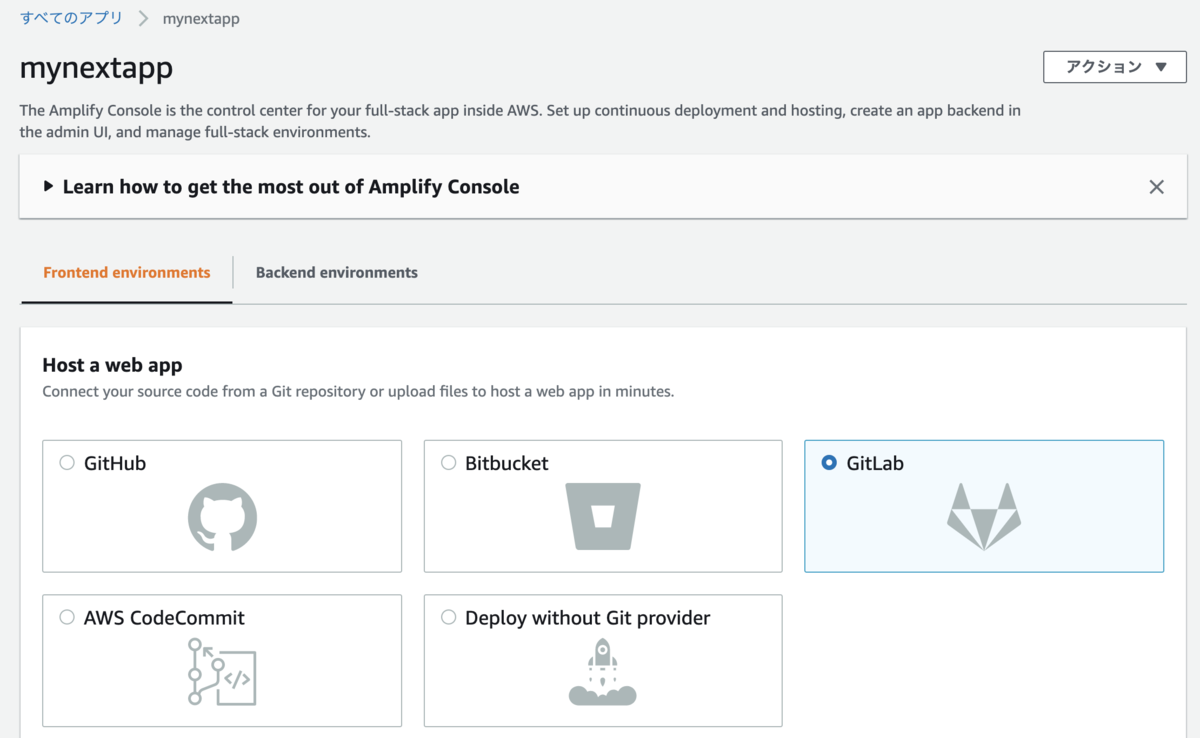
デプロイのタイプをマニュアルかGitベースのデプロイか選べるのですが、 今回はGitベースを選択したので、ブラウザのコンソールでGitのリポジトリの設定を行います。
ホストするサービスを選択します。こちらの例ではGitLabを使用しています。
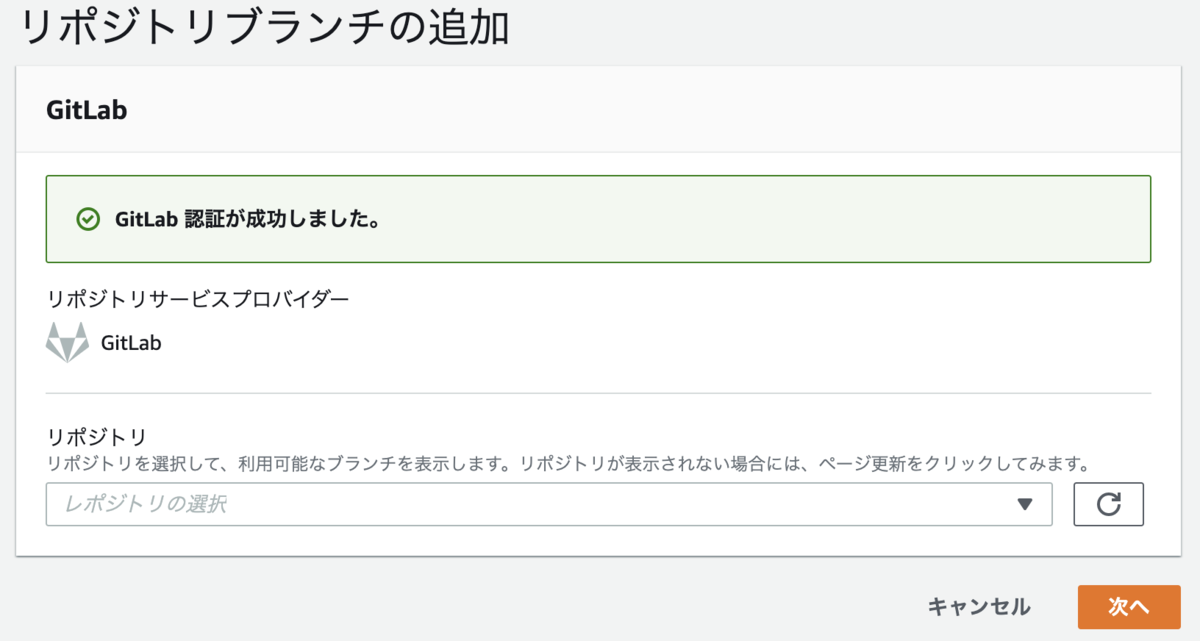
接続するリポジトリを選択します。
接続するとデプロイを開始します。しばらく時間がかかります。
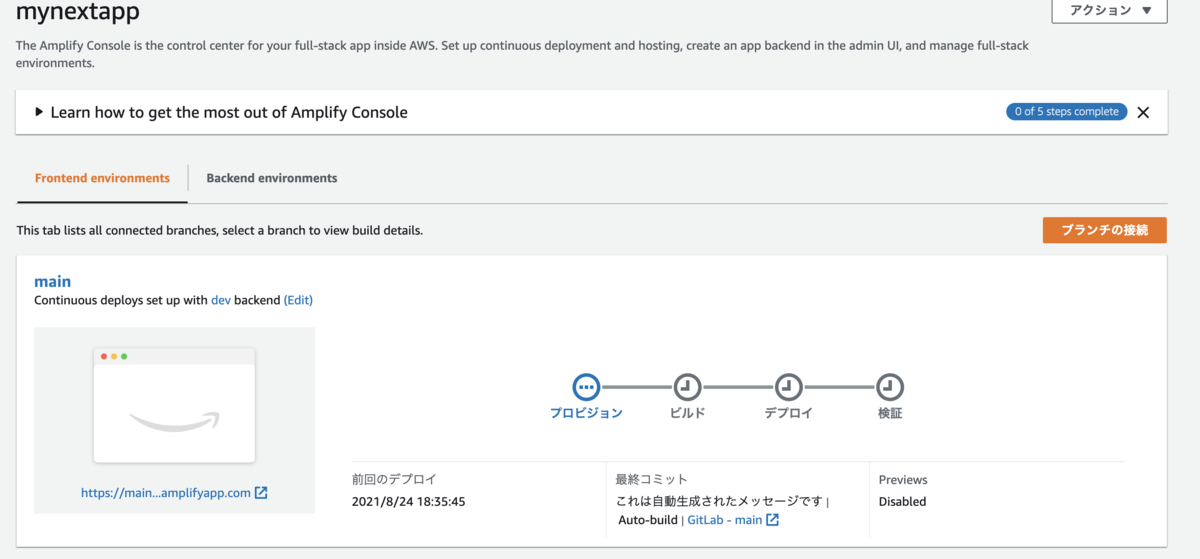
デプロイが成功するのを待ちます。 デプロイが終わるとアプリが公開されます。コンソールに記載されているリンクからWebアプリケーションに遷移できます。
まとめ
今回はAWS Amplifyを使ったアプリケーション開発についてご紹介しました。 バックエンドをほとんど気にすることなくアプリケーションの開発が行えるので、 少ない学習コストでフロントエンドの開発を学習できます。 今回ご紹介した機能以外にも様々な機能をサポートしています。 Amplifyは非常に分かりやすい公式ドキュメントがありますので、こちらを参考に実装してみてください。
P.S.
採用情報
■募集職種
yumenosora.co.jp
カジュアル面談も随時開催中です
■お申し込みはこちら!
news.toranoana.jp
■ToraLab.fmスタートしました!
メンバーによるPodcastを配信中!
是非スキマ時間に聞いて頂けると嬉しいです。
anchor.fm
■Twitterもフォローしてくださいね!
ツイッターでも随時情報発信をしています
twitter.com
