この記事は、 虎の穴ラボ Advent Calendar 2020の 1 日目の記事です。
もうすぐ年末ですね。年の瀬を如何お過ごしでしょうか?
気が付けば今年の思い出はほとんど自宅のおっくんです。
今回は NuxtJS で作る検索フォームを題材に、NuxtJS の環境設定から、GET クエリを利用した実装までを紹介したいと思います。
実行環境
- OS:macOS Catalina 10.15.5
- Chrome 85.0.4183.121
- Node.js: v14.15.1(nodenv による導入)
- NuxtJS: 2.14.6
構成
初めに今回作成する検索フォーム画面の全体の構成を紹介します。

クライアントからアクセスする先は NuxtJS の loalhost:3001 になります。
API へのアクセスは、二通りあります。
- NuxtJS[localhost:3001] -> 食品在庫検索 API[localhost:3000]
- クライアント -> ('@nuxtjs/proxy` での転送[localhost:3001]) -> 食品在庫検索 API[localhost:3000]
二つ目のクライアントから API へのアクセスは、proxy の設定を行っていれば、大きく意識することはなくなります。
API 仕様
NuxtJS を介して使用する 食品在庫検索API の仕様を以下に示します。
エンドポイント
 GET /api/foods/search

パラメータ
  keyword: string(optional)
   名称検索のキーワード
  order: string(optional)
   検索結果並び設定
  foodType: string(optional)
   種別フィルタ

リクエスト例
  http://localhost:3000/api/foods/search?keyword=肉&order=1&foodType=
  (「肉」部分はエンコードされます)

レスポンス例(JSON)
  {
    foods: [
      name: "牛肉",
      foodType: "肉",
      stock: 1,
      limitDay: "2020/11/30"
    ]
  }
テーブル内容
今回は以下のデータが保存されています。(今回の検索にかかわるカラムのみ抜粋)
| name(名称) | food_type(種別) | stock(在庫数) | limit_date(消費期限) |
|---|---|---|---|
| 豚肉 | 0 | 3 | 2020/11/12 |
| 牛肉 | 0 | 1 | 2020/11/10 |
| レタス | 2 | 2 | 2020/11/18 |
| 米 | 3 | 4 | 2020/11/16 |
NuxtJS 環境構築
適当なディレクトリにて、以下のコマンドで NuxtJS の環境を用意します。
# プロジェクト名をsearch-formとします。
npx create-nuxt-app search-form
? Project name: (search-form) Enter
? Programming language: TypeScript #<= JavaScriptでも構いません
? Package manager: Npm #<= Yarnでも構いません
? UI framework: Bulma #<= お好みのものがあれば、他でも構わないと思います
? Nuxt.js modules: Axios #<= Axiosだけあれば今回は十分です
? Linting tools: ESLint, Prettier #<= お好みのものがあれば、他でも構わないと思います
? Testing framework: None #<= 今回の記事でテストには触れませんので外しておきます
? Rendering mode: Universal (SSR / SSG)
? Deployment target: Server (Node.js hosting)
? Development tools: #<= 今回設定は不要です
? Continuous integration: None
? Version control system: Git

cd search-form

npm run dev

? Are you interested in participation? (Y/n) #<= 情報の収集について求められることがあります。確認して判断してください
                                             #   収集内容については  https://github.com/nuxt/telemetry で解説されています。
コンソールに立ち上がったポートが記載されているのでアクセスします。
以下の画面が表示されていれば、ここまで OK です。

設定
この後の開発を進めるにあたって、いくつか追加で設定を行います。
@nuxtjs/proxy の導入
npm install @nuxtjs/proxy を実行し@nuxtjs/proxyを導入します。
こちらが終わったら、nuxt.config.js以下のように書き換えます。
[nuxt.config.js]
export default {
  server: {
    // <= 追記します(1)
    port: 3001,
    host: "0.0.0.0",
  },
  // 省略
  modules: [
    "@nuxtjs/bulma",
    "@nuxtjs/axios",
    "@nuxtjs/proxy", // <= 追記します(2)
  ],
  // 省略
  proxy: {
    // <= proxy以下をすべて追記します(3)
    "/api": {
      target: "http://localhost:3000",
    },
  },
};
(1) アクセス先APIは、3000番ポートで立ち上がるようにしたので、、NuxtJS は 3001 番で起動させます。
(2)(3) @nuxtjs/proxyを導入し、/api以下の URL へのアクセスはhttp://localhost:3000に転送させる設定です。
改めて、NuxtJS を起動しなおし、http://localhost:3001でアクセスできることを確認します。
tsconfig.json の修正
API との通信で使用する Axios の型定義を追加します。
[tsconfig.json]
"types": ["@types/node", "@nuxt/types", "@nuxtjs/axios"] //<= @nuxtjs/axiosを追加します
画面・コンポーネント設計
以下のように画面をコンポーネントに分割して開発していくことにします。

コンポーネントの作成
ここからは具体的に Vue コンポーネントの作成を行います。
食品リストのテーブル行コンポーネント
検索結果のリストを構成する FoodItem.vue を以下の通り作成します。
[components/FoodItem.vue]
<template>
  <tr>
    <td>{{ food.name }}</td>
    <td>{{ food.foodType }}</td>
    <td>{{ food.stock }} 個</td>
    <td>{{ food.limitDay }}</td>
  </tr>
</template>
<script lang="ts">
import Vue, { PropOptions } from "vue";

// 食品在庫のアイテムの型定義
export type Food = {
  id: number;
  name: string;
  foodType: string;
  stack: number;
  limitDay: string;
};

export default Vue.extend({
  props: {
    food: {
      type: Object,
      default: (): Food => {
        return {
          id: 0,
          name: "",
          foodType: "",
          stack: 0,
          limitDay: "",
        };
      },
    } as PropOptions<Food>,
  },
});
</script>
検索ページの作成
検索ページを構成するpages/search.vueを以下の通り作成します。
一旦ここでは検索条件は用意せずに、とりあえずすべて取得することとします。
[pages/search.vue]
<template>
  <main>
    <section class="section">
      <div class="container"><!--後で詳細検索を作ります--></div>
    </section>
    <section class="section">
      <div class="container">
        <table class="table is-striped is-fullwidth">
          <thead>
            <tr>
              <th>名前</th>
              <th>種別</th>
              <th>在庫(個)</th>
              <th>消費期限</th>
            </tr>
          </thead>
          <tbody>
            <food-item v-for="food of foods" :key="food.id" :food="food" />
          </tbody>
        </table>
      </div>
    </section>
  </main>
</template>
<script lang="ts">
import Vue from "vue";
import { Context } from "@nuxt/types";
import FoodItem, { Food } from "../components/FoodItem.vue";

const FOOD_SEARCH_API_URL = "/api/foods/search";

type State = {
  foods: Array<Food>;
};

export default Vue.extend({
  components: {
    FoodItem,
  },
  data(): State {
    return {
      foods: [],
    };
  },
  async asyncData(context: Context) {
    try {
      const result = await context.$axios.get<FoodsApiResponse>(
        FOOD_SEARCH_API_URL
      );
      if (!result.data) {
        throw "No Response!";
      }
      return { foods: result.data.foods };
    } catch (e) {
      console.log(e);
      return { foods: [] };
    }
  },
});
</script>
こちらの時点で一覧を取得できていることを確認をしておきます。
検索フォームコンポーネントの作成
ここでは、食品の在庫を「名称」で検索設定するコンポーネントを作成します。
[components/FoodSearchForm.vue]
<template>
  <div class="field has-addons">
    <div class="control">
      <input
        class="input"
        type="text"
        placeholder="Medium loading input"
        v-model="keyword"
        @keydown.enter="execSearch()"
      />
    </div>
    <div class="control">
      <button class="button is-primary" @click="execSearch()">在庫検索</button>
    </div>
  </div>
</template>
<script lang="ts">
import Vue from "vue";

type State = {
  keyword: string | (string | null)[];
};

export default Vue.extend({
  data(): State {
    return {
      keyword: "",
    };
  },
  methods: {
    execSearch() {
      this.$router.push({
        path: "/search",
        query: {
          keyword: this.keyword,
        },
      });
    },
  },
  watch: {
    "$route.query.keyword"(): void {
      this.keyword = this.$route.query.keyword;
    },
  },
});
</script>
動的なクエリを作成してパスを変更するためにthis.$router.pushを使用します。
また、次に作成する詳細検索条件設定コンポーネントでもキーワードを変更するので、$route.query.keywordをwatchを用いて監視します。変更を検知したなら、プロパティに持っているkeywordを更新します。
こちらはのコンポーネントは、ヘッダーに固定で設置します。
layouts/default.vueは、以下のようにしています。
[layouts/default.vue]
<template>
  <div>
    <header>
      <div class="container">
        <nav class="navbar" role="navigation" aria-label="main navigation">
          <div class="navbar-brand">食品在庫検索</div>
          <food-search-form />
        </nav>
      </div>
    </header>
    <Nuxt />
  </div>
</template>
<script lang="ts">
import Vue from "vue";
import FoodSearchForm from "../components/FoodSearchForm.vue";

export default Vue.extend({
  components: {
    FoodSearchForm,
  },
});
</script>

<style scoped>
header {
  padding-top: 5px;
}
</style>
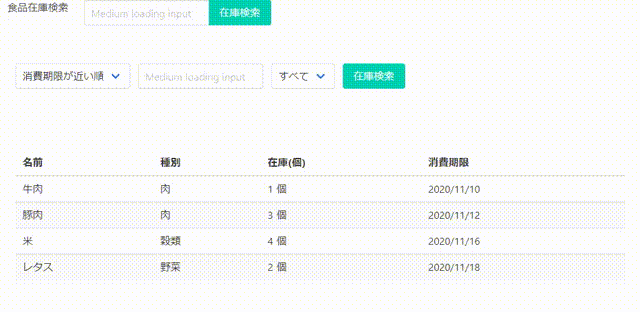
詳細検索フォームコンポーネントの作成
ここでは、食品の在庫の「名称」に加えて「種別」と「並び」で検索設定するコンポーネントを作成します。
[components/AdvancedFoodSearchForm.vue]
<template>
  <div class="field is-grouped">
    <div class="control">
      <div class="select">
        <select v-model="order">
          <option value="0" selected>在庫数が多い順</option>
          <option value="1">消費期限が近い順</option>
        </select>
      </div>
    </div>

    <div class="control">
      <input
        class="input"
        type="text"
        placeholder="Medium loading input"
        v-model="keyword"
        @keydown.enter="execSearch()"
      />
    </div>

    <div class="control">
      <div class="select">
        <select v-model="foodType">
          <option value="" selected>すべて</option>
          <option value="0">肉</option>
          <option value="1">魚</option>
          <option value="2">野菜</option>
          <option value="3">穀類</option>
        </select>
      </div>
    </div>

    <div class="control">
      <button class="button is-primary" @click="execSearch()">在庫検索</button>
    </div>
  </div>
</template>
<script lang="ts">
import Vue from "vue";

type State = {
  keyword: string | (string | null)[];
  order: string | (string | null)[];
  foodType: string | (string | null)[];
};

export default Vue.extend({
  data(): State {
    return {
      keyword: "",
      order: "0",
      foodType: "0",
    };
  },
  methods: {
    execSearch() {
      this.$router.push({
        path: "/search",
        query: {
          keyword: this.keyword,
          order: this.order,
          food_type: this.foodType,
        },
      });
    },
  },
  watch: {
    "$route.query.keyword"(): void {
      this.keyword = this.$route.query.keyword;
    },
    "$route.query.order"(): void {
      this.order = this.$route.query.order;
    },
    "$route.query.food_type"(): void {
      this.foodType = this.$route.query.food_type;
    },
  },
});
</script>
検索ページの改修
検索条件を設定するコンポーネントが用意できたので、検索ページを対応させます。
対応させたpages/search.vueが以下の通りです。
[pages/search.vue]
<template>
  <main>
    <section class="section">
      <div class="container">
        <advanced-food-search-form />
      </div>
    </section>
    <section class="section">
      <div class="container">
        <div v-if="!status" class="notification is-danger">
          在庫リストの取得に失敗しました。
        </div>
        <div v-else>
          <table class="table is-striped is-fullwidth">
            <thead>
              <tr>
                <th>名前</th>
                <th>種別</th>
                <th>在庫(個)</th>
                <th>消費期限</th>
              </tr>
            </thead>
            <tbody>
              <food-item v-for="food of foods" :key="food.id" :food="food" />
            </tbody>
          </table>
        </div>
      </div>
    </section>
  </main>
</template>
<script lang="ts">
import Vue from "vue";
import { Context } from "@nuxt/types";
import FoodItem, { Food } from "~/components/FoodItem.vue";
import AdvancedFoodSearchForm from "~/components/AdvancedFoodSearchForm.vue";
import { AxiosInstance, AxiosResponse } from "axios";

const FOOD_SEARCH_API_URL = "/api/foods/search";

type State = {
  status: boolean;
  foods: Array<Food>;
};
type FoodsApiResponse = {
  foods: Array<Food>;
};
type FoodsResponse = {
  status: boolean;
  foods: Array<Food>;
};

const getList = async (
  axios: AxiosInstance,
  keyword: string,
  order: string,
  foodType: string
): Promise<FoodsResponse> => {
  try {
    const result = await axios.get<FoodsApiResponse>(FOOD_SEARCH_API_URL, {
      params: {
        keyword,
        order,
        foodType,
      },
    });
    if (!result.data) {
      throw "No Response!";
    }
    return { status: true, foods: result.data.foods };
  } catch (e) {
    console.log(e);
    return { status: false, foods: [] };
  }
};

export default Vue.extend({
  components: {
    FoodItem,
    AdvancedFoodSearchForm,
  },
  data(): State {
    return {
      status: false,
      foods: [],
    };
  },
  async asyncData(context: Context): Promise<FoodsResponse> {
    const keyword = context.route.query.keyword as string;
    const order = context.route.query.order as string;
    const foodType = context.route.query.food_type as string;

    const result = getList(context.$axios, keyword, order, foodType);
    return result;
  },
  methods: {
    async update(
      keyword: string,
      order: string,
      foodType: string
    ): Promise<void> {
      const result = await getList(this.$axios, keyword, order, foodType);
      this.status = result.status;
      this.foods = result.foods;
    },
  },
  watch: {
    async "$route.query"(): Promise<void> {
      const keyword = this.$route.query.keyword as string;
      const order = (this.$route.query.order as string) ?? 0;
      const foodType = (this.$route.query.food_type as string) ?? "";
      await this.update(keyword, order, foodType);
    },
  },
});
</script>
サーバーサイドレンダリングする場合と、プラウザからリクエストする場合の処理の内容は同じなので、getList関数として外に出し共通化しました。
サーバーサイド処理されるときの GET クエリはcontext.route.query.[キー名]で取得できます。
クライアント側での GET クエリの取得はthis.$route.query.[キー名]で取得できます。
動作確認
ここまで作ったものを動作させると以下の動画のようになります。
検索パラメータを GET クエリに持たせる利点
- 親子関係のないコンポーネントのやり取りがしやすい。
検索条件を設定するコンポーネントと、検索結果を取得表示するコンポーネント(およびページ)に親子関係がないので、 ヘッダーや、サイドバーに検索フォームを置くなどの動線が作りやすくなります。 - 検索内容をクエリに持つことで、共有してもらいやすい。
例えば、URL にパラメータがない検索フォームでは、A さんが B さんに URL を共有した上でパラメータを伝える必要があります。 URL にパラメータを持っていれば、URL を共有するだけで内容を共有できます。 (セッションやユーザーに依存した検索結果になっていない限りという条件はありますが。)
実は考慮不足があるので対応
ここまでで、キーワードのみの検索フォームと詳細検索フォームどちらからも検索を行うことができるフォームができています。 しかし、ここまでの実装には少なくとも一つの考慮不足があります。 それは、「同じパラメータでの再検索」ができないことです。
pages/search.vueでは、GET クエリを監視プロパティwatchを用いて監視し、変化を掴むことで再度検索を実行しているので、パラメータを変更せずに「在庫検索」ボタンを押しても再検索ができません。
検索フォームコンポーネント側を改修し対応します。
[components/FoodSearchForm.vue]
<template>
  <div class="field has-addons">
    <div class="control">
      <input
        class="input"
        type="text"
        placeholder="Medium loading input"
        v-model="keyword"
        @keydown.enter="execSearch()"
      />
    </div>
    <div class="control">
      <button class="button is-primary" @click="execSearch()">在庫検索</button>
    </div>
  </div>
</template>
<script lang="ts">
import Vue from "vue";

type State = {
  keyword: string | (string | null)[];
};

export default Vue.extend({
  data(): State {
    return {
      keyword: "",
    };
  },
  methods: {
    execSearch() {
      this.$router.push({
        path: "/search",
        query: {
          keyword: this.keyword,
          time: new Date().getTime().toString(), // <= execSearchを実行の都度時刻を取得しクエリに含める
        },
      });
    },
  },
  watch: {
    "$route.query.keyword"(): void {
      this.keyword = this.$route.query.keyword;
    },
  },
});
</script>
上で示したように、検索のパラメータに加えて実行時の時刻を文字列化してクエリに追加します。
このようにすることで、検索パラメータが変わらずとも、$route.queryを介して検索の再実行が可能になります。
同様の実装を、components/AdvancedFoodSearchForm.vueにも行います。
今回は NuxtJS で GET クエリの取り扱いを検索フォームの作成をすることで見てきました。 まだまだ、使い始めて日も浅いので「こんな技があるぞ!」なんて方がいたらぜひコメントで伺ってみたいです。
この記事は、 虎の穴ラボ Advent Calendar 2020の 1 日目の記事です。
明日は、磯江さんのKotlinのライブラリに関する記事です。
以降も続々記事が公開されますので、ご期待ください。
P.S.
カジュアル面談
弊社エンジニアと1on1で話せます、カジュアル面談も現在受付中です!こちらも是非ご検討ください。 yumenosora.connpass.com
その他採用情報
虎の穴ラボでの開発に少しでも興味を持っていただけた方は、採用説明会やカジュアル面談という場でもっと深くお話しすることもできます。ぜひお気軽に申し込みいただければ幸いです。
カジュアル面談では虎の穴ラボのエンジニアが、開発プロセスの内容であったり、「今期何見ました?」といったオタクトークから業務の話まで何でもお応えします。
カジュアル面談や採用情報はこちらをご確認ください。
yumenosora.co.jp
